Saturday, 13 February 2016

Try now for VPS Vultr with $52 FREE credit new

Vultr – A cloud services provider based on 100% SSD Hardware with 14 Optimized locations worldwide. Vultr provides ultra fast KVM based cloud servers in 14 cities around the globe for just $0.007/hr.
Vultr has 768Mb RAM VPS Hosting plan for $5/month which is extremely cheap in the hosting market. I have used Vultr VPS service for over 12 months and it was just awesome, very robust service, amazing performance with 3,3 GHz Intel CPUs and solid state drive (SSD).
Now you can try for free with Vultr Coupon! Vultr is offering $52 in account credit for every new verified account, $50 gift code plus $2 free credit with Twitter. Just sign up, follow verification procedure and start deploying blazing fast cloud services!
Try Vultr Free

Valid Vultr Coupon Code – Vultr Gift Code

To get $52 Free Vultr Credit, just follow these steps:
1. Click below button, signup and get $50 free trial credit


2. Go to Vultr’s Twitter Promotion Page, click follow @Vultr, tweet about Vultr and get $2 more free credit
3. You have total $52 credit to deploy VPS/Server.
Others Vultr Coupon
  20$ must be use in 30 days from the day you create the account.<<<click here>
Good luck!

Vultr are donated free $22 for new accounts

Currently Vultr VPS providers are free gift code donated $ 20 plus $ 2 Twitter donation program last time. In total you will get $ 27 when registering a new account at this time.
VPS at Vultr quality very good, I’m confident to use for blog Sharing and Learning VPS Coupon. Along with Japan datacenter location, Los Angeles to speed very quickly on Vietnam is not inferior to domestic suppliers so you can be assured of long-term use.
After registering an account here, please visit the Billing to perform charging $ 5 through Paypal account to verify the account (visa VN blocked most of it already should not add information card).
Next, you go to Billing and filled gift code below, you will receive $ 20 in your account.
  SSDVPS
Vultr-free-20-USD
*** Similarly times before, this time Vultr Coupon expires very quickly, so if you’re wondering whether or not to enlist Vultr then right opportunity this time to experience offline.
Visit Vultr HERE.

HOW TO BUILD A VPS ON VULTR

In this article I will not comparing Vultr vs DigitalOcean but simply giving short introduction (or may be review) about what Vultr.com is and what do they offer.
Meet Vultr! a cloud-like VPS hosting provider by Choopa. Its main virtualization technology is KVM and all their node servers are using SSD. The same as DigitalOcean. In fact, many says Vultr is just a copy of DigitalOcean by different company. Even its main web design is similar to old DO’s website.
The main part that makes me feel interested (besides it is new) is its competitive price. Its smallest plan is purchase-able at $5/month, the same as DO but Vultr offers bigger RAM (768MB). Also, while DO currently offer servers at 3 (three) different locations (US, Netherland, and Singapore), Vultr offer wider location including 6 locations in US, 1 in Netherland, 1 in UK, 1 in France, 1 in Australia, 1 in Japan and 1 in Germany.
vultr-location
Obviously that’s a plus one of Vultr while its competitors do not offer (including DO).
Vultr currently provides various .ISO image to boot your VPS to (or install on). Couldn’t find your favorite OS? Users of Vultr are also allowed to boot from Custom .ISO which can be uploaded via its remote upload interface with 5GB max file size.
vultr-iso
Even the price is monthly but its billing mechanism is hourly billing which means you’ll only pay as you go or pay only for the time you use and cancel any time. That’s just the same as DigitalOcean and like many other cloud providers.

HOW TO CREATE A VPS ON VULTR?

Your VPS in Vultr is called an Instance, the one that in DigitalOcean called a Droplet.
Building an instance (or a vps) is pretty easy. First, create an account at Vultr.com. Simply enter your email address and password. Once done, login to your account!
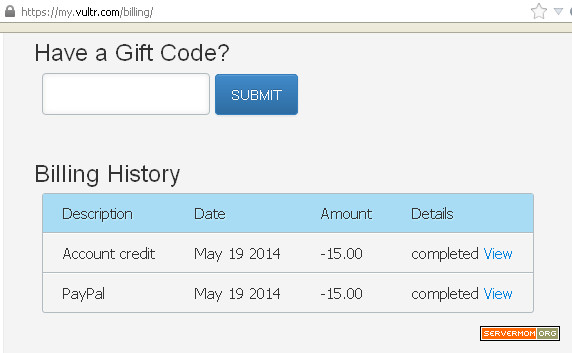
Step 1 – Obviously you’ll need to add fund in your account credit (balance). Simply click the billing tab and choose Paypal or Credit Card to make your payment. The last time I check they still run a promo offering double your balance for up to $100. For example, if you add $100 to your account it will be doubled so you’ll have $200 in your balance.
vultr-billing
Step 2 – Click on the Deploy tab.
Step 3 – Choose your server type: PERFORMANCE or LARGE STORAGE. Seeing its information you’ll exactly know what’s the difference among them.
vultr-servertype
Step 4 – Next, choose in which location you’ll deploy your server to.
vultr-choselocation
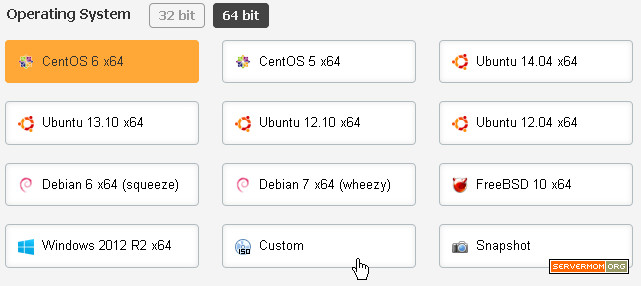
Step 5 – Do not also forget to choose the Operating System (OS) to run it on your deployed server:
vultr-choose-os
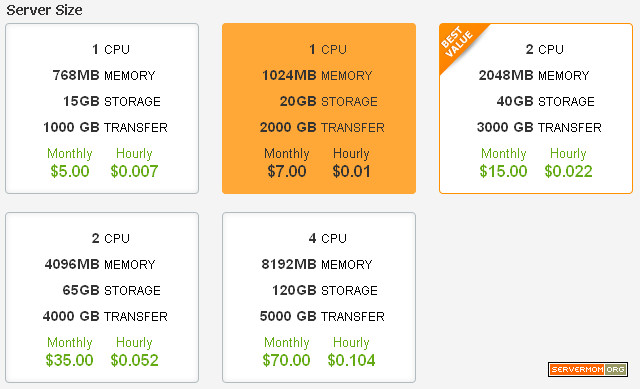
Step 6 – In the Server Size section, it is the place where you can choose how powerful your server’s specification will be. You can pick up to 8GB RAM, 4 CPU power, 120GB SSD and 5TB bandwidth.
vultr-server-spec
Step 7 – Once done, hit the big blue Deploy button.
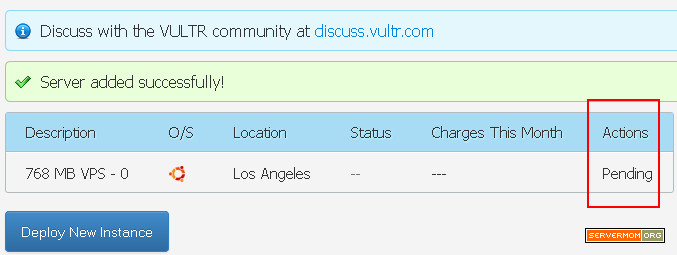
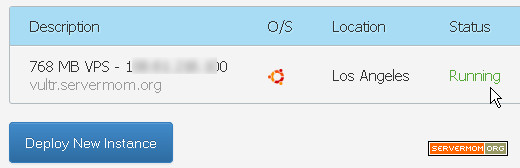
Step 8 – You’ll be redirected to the My Servers page and you’ll see the success message there. Unlike DO, you’ll see no progress bar but just the action status.
vultr-pending-vps
It should be created within a minute.
Step 9 – Refresh that page and you should now see a green “running” text under the Status column. It means your server is ready to use.
vultr-running-instance
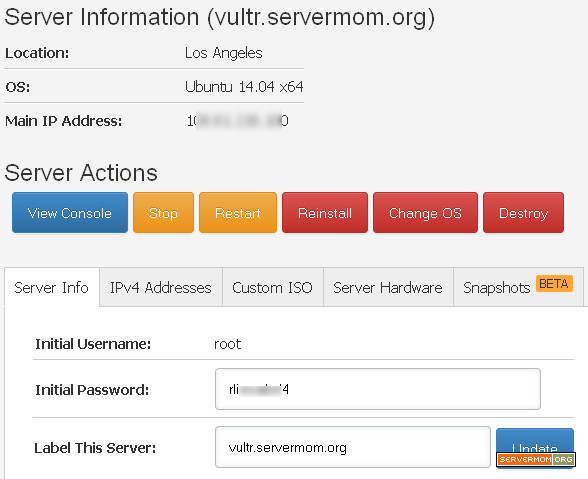
Step 10 – Next, grab your root password in the Instance’s management page. Simply click the “Manage” link for that instance (the link under Actions section).
vultr-detail-page
As you can see in that page you’ll find basic information of your server including Location, OS and Main IP Address. In the Server Info page you can also see your root password.
That’s it. Now you can bring up Putty or Terminal in your local PC and connect to your server via SSH at port 22 (default) using given IP address and given root password.
p.s: In that page you can also do some basic management tasks like to Stop, Reboot, Reinstall, Change OS and Destroy your vps.

VULTR VPS REVIEW

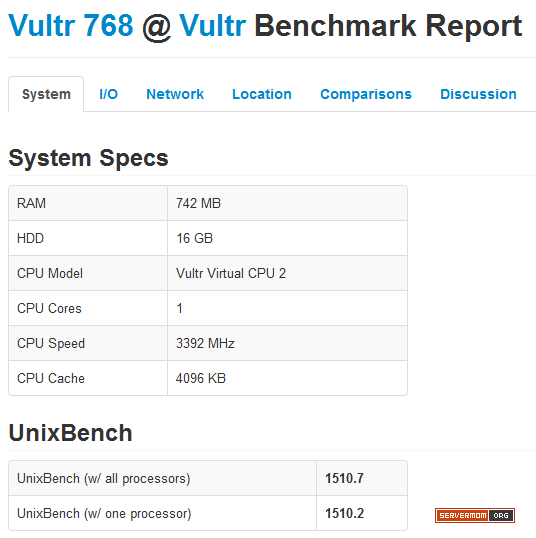
Here it is my result of some basic benchmarking test on a Vultr instance.
Instance Specifications:
  • RAM : 768MB
  • CPU : 1 CPU
  • Storage: 15GB SSD
  • bandwidth: 1TB
  • Price : $0.007/hr or $5/month

FREEVPS.US SIMPLE BENCHMARK TEST

Script used:
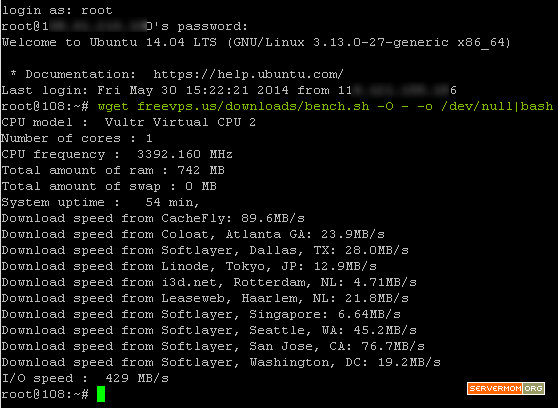
wget freevps.us/downloads/bench.sh -O - -o /dev/null|bash
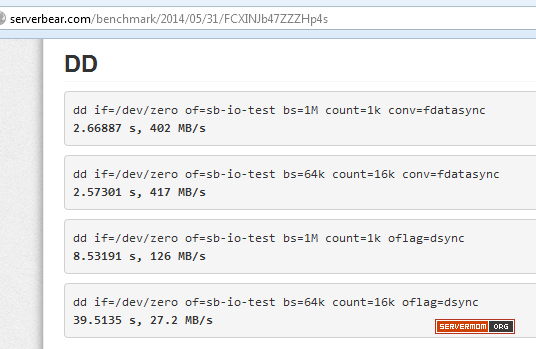
This simple benchmark test script will scan for server specs like number of CPU coresCPU frequencytotal amount of RAMSWAP and current system uptime. Once the scanning done and the result displayed, the benchmark script will test server’s Internet speed by downloading some test files from several location spread around the world from US, Japan, Netherland, and Singapore. Also, it will perform a simple DD test to find out current I/O speed. And my result is:
vultr-freevps-test
As you can see from the result above, the I/O speed is great even not as fast as RamNode. Also,the download speed is fast from major US region

SERVERBEAR COMPLETE BENCHMARK TEST

I use ServerBear’s benchmark script to perform more complete benchmarking test:
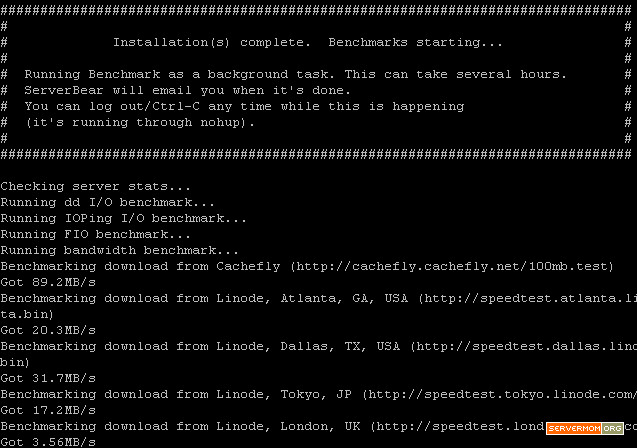
wget -N https://raw.github.com/Crowd9/Benchmark/master/sb.sh&&bash sb.sh '10159' '2419' 'tisbi@acentri.com' ''
This script will Download and install packages to run UnixBench; Download and run UnixBench; and Upload to ServerBear the UnixBench output and information about this computer.
vultr-sb-test2
vultr-serverbear-768
vultr-serverbear-768-dd
You can also view all submitted benchmark results at ServerBear. If you go to that page you’ll see the best ever Unixbench score is 4120.8 and the worst ever is 1082.9. That’s great.

F.A.Q

It is such a lame tutorial. Why did you write it?
Not everyone is as great as you and I already tagged this post as “basic”. So if you still feel this post is lame, then please do not read basic tutorials and search for advanced ones out there. I believe many newbie will feel helpful.
Besides, at the time of writing I found Vultr have not so many articles in there community knowledge base (unlike DO).
Vultr vs DigitalOcean, which one you prefer?
Me? I believe putting mission critical app will be better at DigitalOcean as it is older (and bigger) company running such service, I believe. However in terms of performance, both of them are great. It’s just a matter of budget then.
Between 1 to 10, how you rate Vultr?

Friday, 12 February 2016

Best VPS Hosting 2016 new

Here is updated list of Best VPS Hosting 2016. A Virtual Private Server is an ideal solution for someone who is looking for a scalable solution with a dedicated server alike functionality at a fraction of the cost a dedicated server. Basically it is a virtual machine sold as a service by a web hosting provider. VPS customers have superuser-level access of operating system and can install any software of their choice. In this article we will discuss about 2016’s Best VPS Hosting Providers.
Deal of the day:

List of 2016’s Best VPS Hosting Providers

Here are the most trusted VPS Hosting providers of 2016.

#1 Bluehost

bluehost vpsBluehost is one of most trusted and oldest web hosting provider available online. The web hosting company was founded in 2003. Currently the web hosting provider is managing more than 2 million websites. This is one of the most preferred choice for someone looking for a web hosting provider with great support and economical pricing.
Bluehost offer 4 different VPS Hosting plans that can be fit in every kind of requirements. You can host a website with low traffic to a website with lakhs of visitors per day on Bluehost VPS servers. The VPS comes with plenty of disk space and bandwidth. On the top of it, you get 24*7 expert support and anytime money back guarantee.
We must say Bluehost is excellent value for money VPS Hosting provider. The kind of VPS Hosting, Up time & Support you receive for the price you pay is unmatched.
Bluehost is also recommended by WordPress officially. If you’re looking for a VPS to host a WordPress website, Bluehost is an obvious choice.

#2 Arvixe

arvixe vpsArvixe is known as the dark horse of web hosting industry. The web hosting company is around since 2003 and offer web hosting services for almost every popular application available on internet e.g WordPress, Drupal, Joomla, Magento, Concrete5, vBulletin, MyBB, Elgg, ClipBucket etc. You can buy shared hosting, VPS or Dedicated server hosting from Arvixe.
Arvixe offers one of the best VPS Hosting services at a very affordable price with best in-class customer support. You can choose from Linux and Windows Operating System. You get a choice to choose from 3 different plans. Most of the plans offered by Arvixe are fully managed and comes with a free WHMCS and cPanel.
You also get an option to add SSD Drive, Extra Space, R1Soft Remote Backup, Additional RAM with your plan at an additional cost.
Arvixe has SAS 70 Type II Certified data centers. They’re capable of detect Brute Force, DDoS attacks.

#3 Inmotion Hosting

inmotion hosting vpsInMotion Hosting offers a great deal if you’re looking for a VPS Hosting solution with SSDs. SSDs are 20X faster than HDDs. The web hosting provider offers 3 different VPS Hosting plans. All plans comes with 90 days money back guarantee, free backups, raid 6 and allows you to host unlimited websites in one server.
Inmotion Hosting utilize multiple data centers, premium bandwidth providers, and advanced routing technology to make sure their server runs better than many other VPS Hosting providers.
With every plan you get up to 4 IPs, up to 8 GB of RAM, up to 200 GB of disk space, full cPanel license, Unlimited MySQL Databases.
Burstable RAM is also available during times of high traffic with each Inmotion VPS Hosting plan. Free automated backups up to 10GB is also available with selected plans.

 #4 LiquidWeb

liquidweb vpsLiquidweb is known for its Managed VPS Hosting services. They have one of the best customer support team that is available for you 24*7 and gives you 30 minutes response time guarantee.The VPS hosting solution offerd by Liquidweb runs on a cloud platform and it is highly scalable. The hosting provider claims to offer 100% network uptime and they almost made it everytime.
Some of the major features that Liquidweb offers with VPS Hosting are
  • Daily Billing – Pay only for what you use
  • Upgrade or Downgrade your server anytime
  • Free incoming bandwidth and 5 TB outgoing bandwidth
  • Easily create & deploy server images
  • Real time monitoring
  • Powered with SSDs
  • API Access
  • SLA guarantees 59 Second or less response times on phone
The web hosting company is around since last 15 years and employes highly qualified web hosting experts. The company owns 3 data centers and Over 400 On-site Staff Members. The web hosting company enjoys 40,000 clients in more than 150 countries that makes it truly global. Some of Liquidweb clients are FedEx, Motorola, The Home Depot etc.
The web hosting company offers 10 different VPS Hosting plans that scalable from 1GBRAM to 512GB RAM. All plans can be chosen with fully managed with cPanel.

#5 MediaTemple

mediatemple vpsMediaTemple is an award winning web hosting company offer self managed,Managed & fully managed VPS Hosting services. All VPS Hosting plans comes with double the RAM and SSD storage with 99.999% uptime.
Currently the web hosting company is operating from is headquarter located in Culver City, California, United States and employ more than 225 employees. In October 2013 the company was acquired by Godaddy. Currently the company operates as a independent company.
Some of the features of MediaTemple Fully Managed VPS are
  • Performance monitoring
  • Automatic Daily Backups
  • OS & application updates via panel
  • Security & malware scanning
  • Automated malware removal
  • Server setup & configuration
  • 24*7 priority support
Media Temple is also very popular for Managed WordPress Hosting.

How Does VPS Hosting Works?

In a layman terms, VPS Hosting works similar to dedicated server hosting and offers all alike features that a dedicated server offers at a fraction of the cost of a dedicated server. Technically a VPS is created by partitioning a physical server into multiple virtual servers using a visualization software. Each virtual server is now capable to run its own operating system and enjoys assigned system resources like RAM, Processor, Disk Space etc.
On a single physical server there could be multiple virtual servers sharing the same system resources but the client get access to their own server. All virtual servers are completely isolated from one another that means better security.

When You Should Move to VPS Hosting?

Generally it is recommended to switch to VPS hosting when your website starts getting lots of visitors per day that makes your website slow or inaccessible or your web hosting provider warned you that your website or application is consuming lots of server resources and recommend you to switch to a dedicated server hosting plan.
Shared hosting providers like Bluehost throttle the customer€™s account, and limit the number of users can access the website when they feel a website is using too many server resources. This is the ideal situation you should move to a VPS Hosting plan.

Managed Vs Unmanaged VPS Hosting

You may get confused between Managed and Unmanaged VPS Hosting plans while buying a VPS Hosting for yourself. In today’s time almost all hosting providers offer an option to choose between the two kind of hosting plans.
Managed VPS Hosting plans are popular now a days and they’re recommended when you’re not familiar with managing servers. In managed VPS Hosting, your host install, configure all the necessary software for you and also manage all the updates for you.
If you’re an expert in server management and don’t need anyone to take care of your server except the network uptime, unmanaged VPS Hosting is probably the right solution for you. In un-managed VPS Hosting services, the server only take care of the network up-time, anything related to

How To Choose The Best VPS Hosting?

VPS Hosting is highly scalable and someone should choose is based on its future requirements. If You need a VPS just because your website started getting lots many visitors and your shared hosting plan is not capable of handling the load, you probably go with any VPS Hosting provider mentioned above, but if you’ve some plans to scale up in future and required professional assistance at every stage of your website growth, we would recommend you to go with managed vps hosting providers like Arvixe, Liquidweb or Media Temple.

Thursday, 11 February 2016

How to install windows7 vps vultr

Windows7 VPS Remote Desktop

How to install Windows7 VPS

I always wanted one working windows7 cheap vps, because offered windows versions by major vps providers is web oriented or not offering windows,and remote desktop not working fastenough i did this tutorial to help you to create your own windows7 vps. For this tutorial you need to create account on Vultr because they offer Custom ISO support, and is very easy to use and cheap too. I used lowest vps available 768RAM/1CPU and windows running fine.
Update: Check Vultr 50$ Free)

1) Create your Vultr account or use yours on other providers if they supports custom iso and using (KVM) virtualization.

For creating new VULTR account go here create new account, you need to deposit minimum 5$ and they offer you another 5$ free promotion and if you share on twitter vultr site you will get another 2$. ( 5$ for total 12$ , is good enough, no?

2) Building your VirtIO Windows7 Image

Something to know:
** ASK your provider about installing non-server versions like Vista/7 if is allowed **
Because windows7 does not recognize hard drive and network of KVM virtualization system you need to put virtio drivers in your windows7 iso image.
Please dont use pirated windows versions because they report you and your VPS will be suspended on all major VPS providers, so you need to use an original windows image for this and if you dont have one legal serial for this use just trial versions.
I already created one windows7 + virtio drivers from original iso mirror from microsoft site but i dont know if is legal to modify/host it and share with you.
Windows7 Virtio
I recommend you to build new one but if you want to check my windows7 iso use: win7_ulti_virtio64.iso – Windows 7 VirtIO 64bit ( If something is wrong with posting modified windows 7 please contact me and i will remove fast. )
Windows7 VirtIO building process: (I used windows machine to create new ISO file, for extracting iso files you can use WinRAR)
1) Download original ISO image fromhttp://mirror.corenoc.de/digitalrivercontent.net/ ( image used by me forWindows7 Ultimate 64BIT isen_windows_7_ultimate_with_sp1_x64_dvd_u_677332.iso )
2) Download VirtIO Drivers from http://storage.getvps.ninja/virtio/virtio-win-0.1.100.iso
3) Extract windows iso file to c:\newbuild and create new directory in c:\newbuild named “virtio”, now extract virtio-win iso to c:\newbuild\virtio.
4) Creation of windows7 bootable iso from directory:
1) Go to ImgBurn download and install
2) After you installed ImgBurn , run it and click on “Create image file from files/folders” section.
3) In source input of ImgBurn put: ‘c:\newbuild
4) Go in menu Advanced > Bootable Disc and use this configuration:
Select ‘Make image bootable
Emulation Type: ‘None (Custom)’
Platform ID: ’80×86′
Sectors to load: 8 ( 8 is used for my recommanded ISO and windows version but you can check correct value by checking size of etfsboot.com , if file size is 2K
correct value is 4 , and for 4K correct value is 8)
Boot Image: etfsboot.com ( can be founded on c:\newbuild\Boot\ )
5) BUILD!
If something goes wrong you can check this tutorial, contains images of working Imgburn process and can be more easy.

3) Using Windows7 VirtIO on Vultr

In the same way as OpenBSD VPS Tutorial you need to upload ISO image somewhere and add to your ISOs library on vultr/other account.( if your installation process not start at first try, wait 2-3minutes and restart your VPS )
1) Installing VirtIO drivers for hard drive:
You cant see vps hard drive to install windows whitout installing this driver.
Select Load Driver:
Windows7 VirtIO: Select Load Driver
Select “Browse” and select driver from your cd installation:
Select VirtIO HardDrive Driver
Select “Red Hat VirtIO SCSI controller” and Next:
Select VirtIO Driver
Now you can continue your installation normaly!

4) Installing VirtIO Network Drivers on Windows7

Now your VPS have windows7 installed, but network still not working.
You need to go in Control Panel > Devices Manager > Ethernet Controller > Update Driver > Browser my computer for driver software , and browse for driver on CD same as hard drive step/same driver location.
Windows7 VirtIO Network Driver Success
After this you have working internet access on your windows7 vps.

5) Enable Remote Desktop on your Windows7 VPS

For remote desktop go in Control Panel > System > Remote settings and select “Allow connections from computers running any version of Remote Desktop”

Thank you for reading this, if you need some help just comment!